


The Salesforce Spring ’25 Release brings a host of new features and enhancements, focusing on improving user experience, automation, and AI-driven capabilities. Specifically, key updates include advanced flow enhancements, streamlined reporting tools, and expanded integration options. These improvements are designed to boost productivity, simplify processes, and offer more flexibility for developers and admins, ultimately helping organizations drive greater efficiency and innovation. Now, let’s explore the top new Flow features.
1. Screen Flows with Built-In Visual Progress Indicators
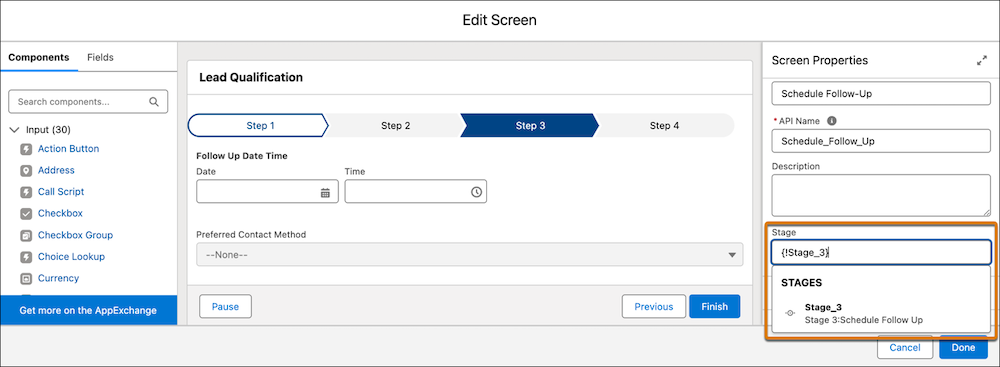
Salesforce Spring ’25 brings visually guide your users through the stages of your screen flows by using the built-in progress indicator—no more writing custom code to create your own. Your users see which stage they’re on and how many stages remain. Configure whether you want to show the progress indicator at the top of the screen or in the footer. Pick from a simple-style or a path-style progress indicator. Path-style progress indicators are supported only at the top of the screen.
Progress indicators use stage variables to determine what stage the user is on. When a screen loads, $Flow.CurrentStage is automatically updated to the stage that’s associated with the screen, and the stage is added to the end of $Flow.ActiveStages if it isn’t an active stage already. Create stage resources and define the stage label, order, and whether the stage is active by default or not. Then, select the stage resource under the Stage field of the Screen element, or assign the stage resources manually by using assignment elements.
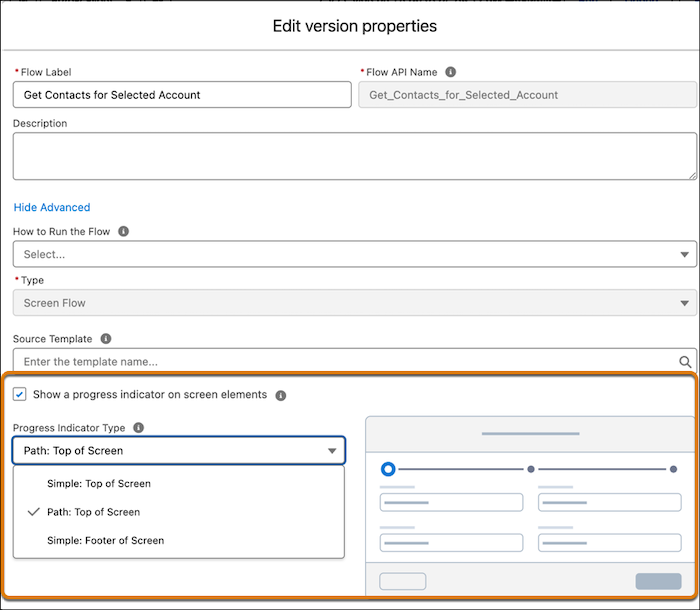
Finally, to show a visual progress indicator, open the flow version properties. Then, select Show a progress indicator on screen elements and then select the progress indicator type.
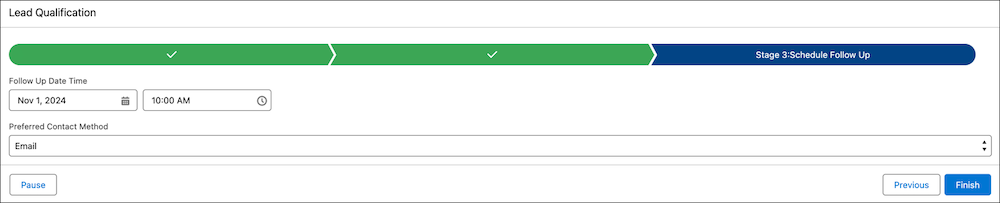
The user sees their progress on the page at run time.
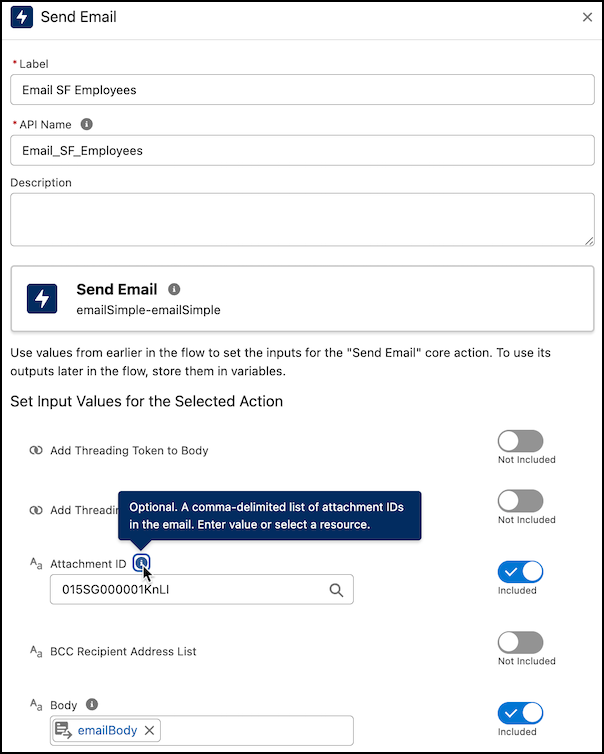
2. Send Emails with Attachments in Flow Builder
In Flow Builder, in the element menu, search for and select Send Email. When you set input values, turn on the Attachment ID field, and then add the ID of the attachment. The ID can be of a Document, Content Version, or Attachment items. If you want to add more attachment IDs, enter them as a comma-delimited list. The maximum size of the email created, including attachments, is 35 MB.
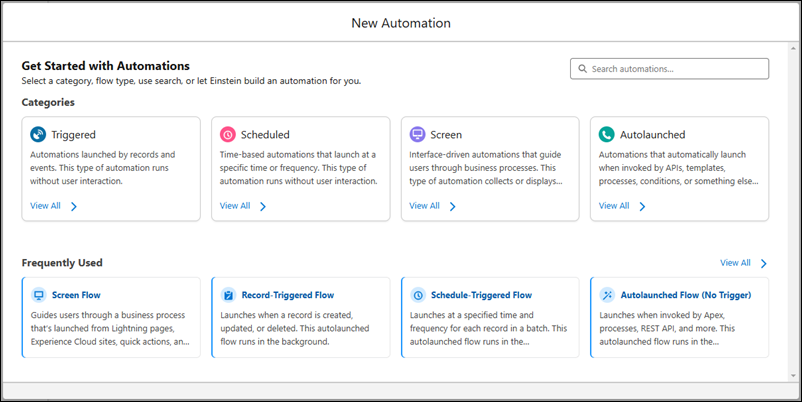
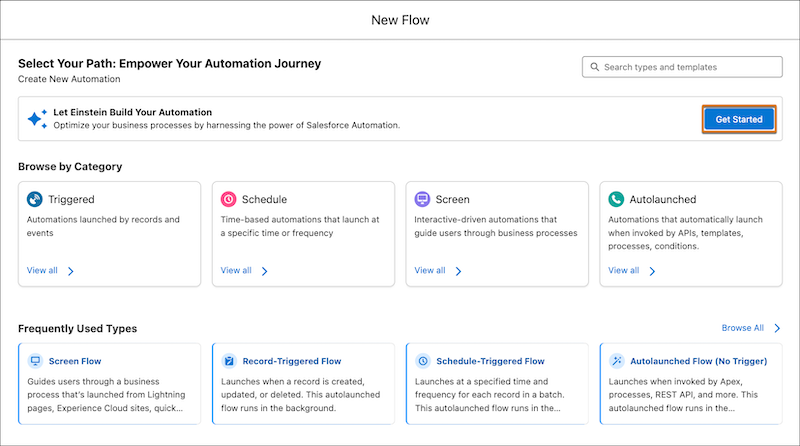
3. Organized the Flow Creation Window
Reorganized the flow creation window to help you create the automation you need quickly and more efficiently. Flows are separated into four main categories, and you can filter and search to find the automation you need. To access the new flow creation experience, click New Flow from the Automation Lightning app.
4. Generate Detailed Flow Description with Einstein Generative AI
The summary describes all the flow steps and includes the input and output variables, the objects that the flow changes, and the subflows that the flow refers to. You can then add the generated summary to the flow description to keep everyone informed.
Turn on Einstein generative AI in Setup. Next, from Setup, in the Quick Find Box, enter Flow Creation with Einstein, and activate it. To summarize a flow, open it in Flow Builder. In the Einstein panel, click Summarize Flow. The Einsten panel is open by default. If you don’t see it, click Einstein
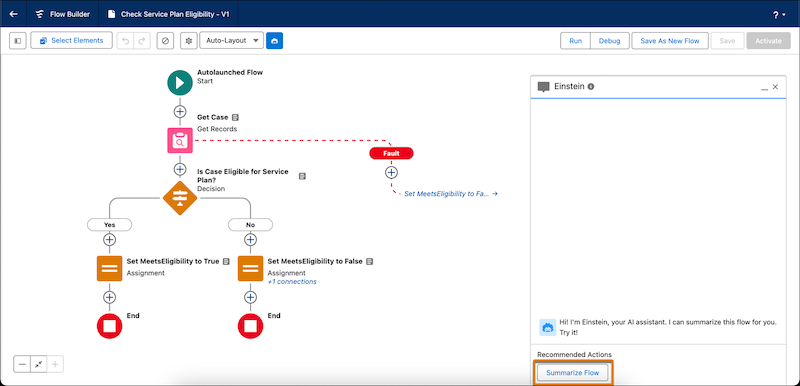
.After you generate the summary, you can shorten or lengthen it (1). The standard summary provides a high-level overview and includes the objects that were modified in the flow. The shorter version summarizes the flow in one or two sentences.

5. Responsive Screens with Automatically Triggered Screen Actions
You can now run autolaunched flows automatically in the background when the input values associated with screen actions change. Previously, the only way to trigger a screen action was with the click of a button by using the Action Button component. The output can be displayed on the same screen, so your users can see the results of their actions on the same screen without clicking any buttons.
In Flow Builder, create an autolaunched flow that retrieves data and saves that data in output variables. Activate the autolaunched flow. Then, create a screen flow and add a Screen element. Next, add a screen action and select the autolaunched flow that you created. Configure the screen action, and set input values. After that, add another component to the screen element that uses the output of the autolaunched flow. To use the output from the autolaunched flow, in the screen component’s input, select the autolaunched flow, then Results, and finally the output variable from the autolaunched flow. You can see only the variables that were marked as Available for output. Then, save and run the flow.
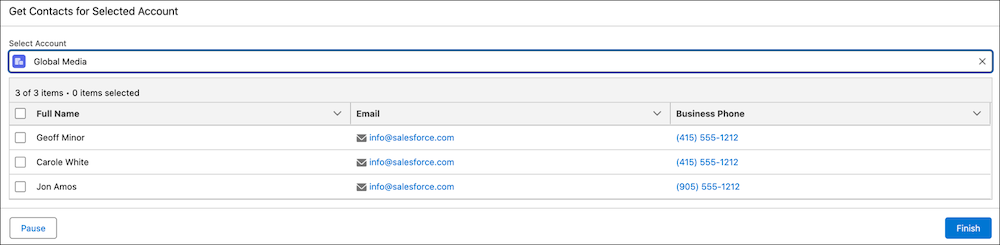
For example, suppose you want to automatically show all contacts for a selected account record. Create an autolaunched flow that retrieves all contacts for an account. Activate the autolaunched flow. Then, create a Screen flow and add a screen element to it. Add a Lookup component so that users can select an account record. Add the activated autolaunched flow as a screen action and set the input values. This way, the autolaunched flow runs when the input values for the Lookup component change. Lastly, add a Data Table component, and add the Full Name, Email, and Business Phone columns. The output of the autolaunched flow automatically populates the Data Table when the lookup value changes.
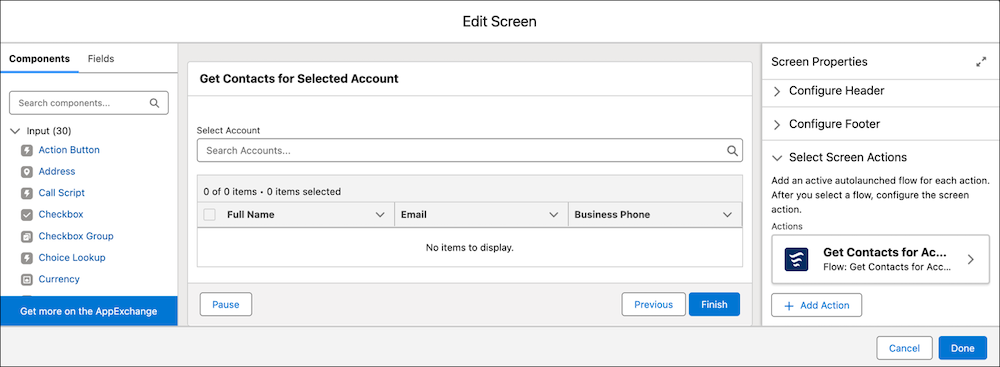
At run time, when your user selects an account, they automatically see all the contacts for that account on the same screen—no button clicks required.
6. Join Collections with the Transform Element
Combine source collections from related flow resources into one target collection. For example, you can combine order records from an external system with Salesforce orders to get a combined data structure that is displayed in a data table in a flow screen. The flow screen shows each order along with the amount and the quantities. From Flow Builder, add the Transform element. Add two flow resources for the source collections. Add a target collection that stores the combined data from the source collections.
Configure the join keys for each source collection, and select the join fields to return into the target collection.
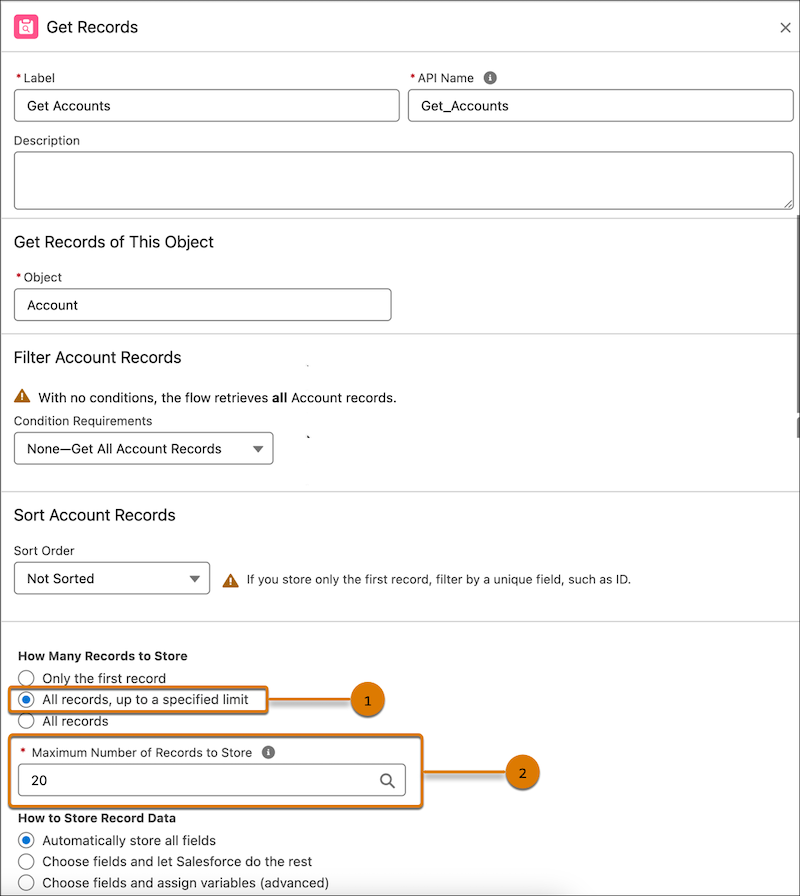
7. Maximum Number of Records Retrieved with Get Records
When you work with large datasets, you can hit performance issues or governor limits if you use the Get Records element to retrieve all records. If you set an upper limit to control data retrieval, you improve flow performance and reduce the risk of timeouts or errors. Use the All records, up to a specified limit option to set an upper limit on the number of records to retrieve.
To set a limit on the number of records that the Get Records element retrieves, first add a Get Records element to your flow. Then, under How Many Records to Store, select All Records, up to a specified limit (1). Enter the maximum number of records to store (2). The Get Records element retrieves all the records that meet the criteria up to the specified limit.
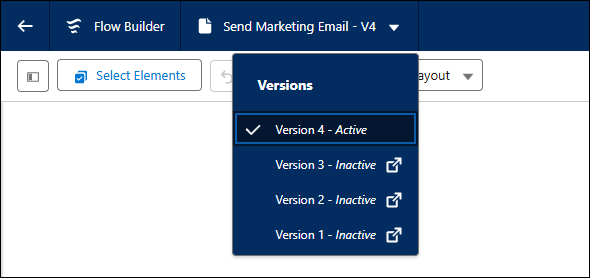
8. Change Flow Versions in Flow Builder
Salesforce Spring ‘25 brings option to manage different versions of a flow and view the status of each version in Flow Builder. To see a flow’s versions, click the flow’s name in the Flow Builder navigation header. Clicking on a different version opens that version in Flow Builder in a new browser tab. To access different flow versions and see their statuses, click the name of the flow in the Flow Builder navigation header.
9. Immediate Feedback for Invalid Values from Screen Components
Now your flow user can see whether an input value in a flow screen component is invalid when the user changes the focus to outside the component. For example, the user enters a value for an email component. The component validates that the input value contains the right domain as soon as your user clicks another screen component. Previously, component validation error messages appeared only when you moved to another screen or finished the flow.
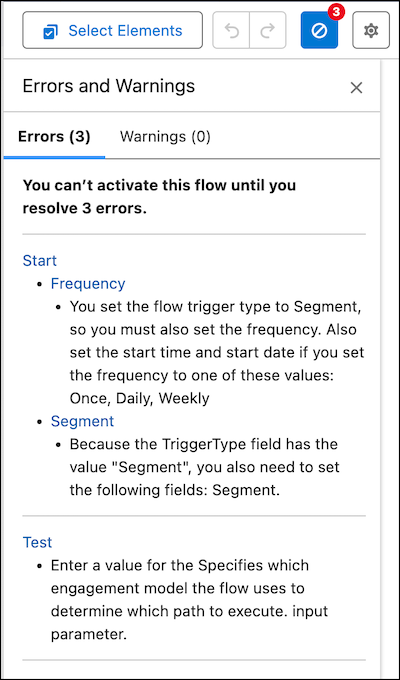
10. Troubleshoot Your Flow Configuration
You can now dismiss warnings that you don’t want to see again from the Errors and Warnings pane. The pane also includes more actionable messages for all elements, with links that direct you to the source of the error on the Flow Builder canvas. Errors are grouped by element so that you can address them more efficiently.
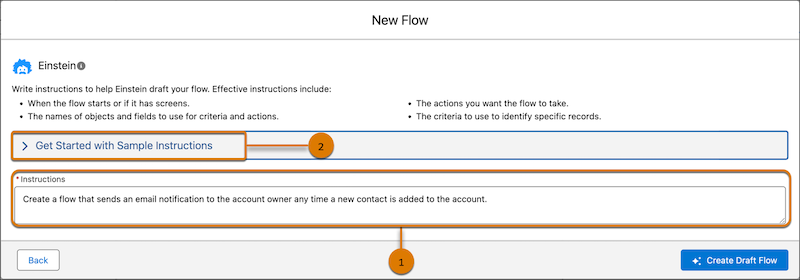
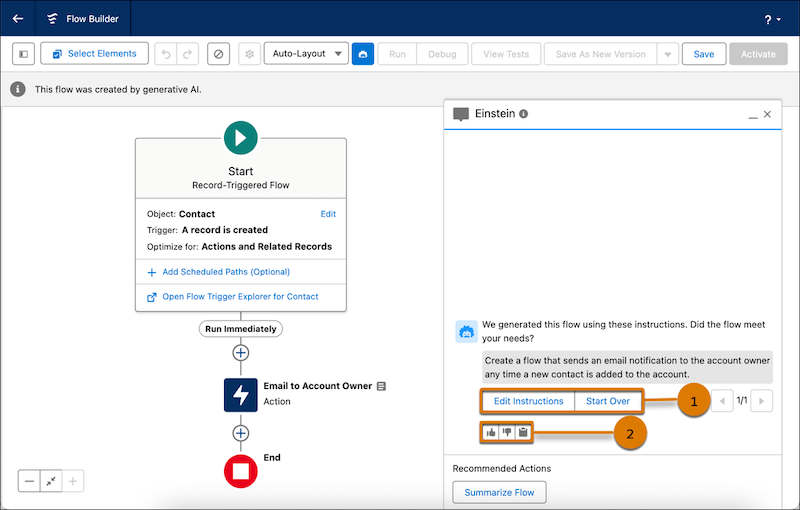
11. Building Flows Faster With Einstein Generative AI
Einstein now generates more accurate flows, and it does so faster than before. You can help Einstein get even better by using the prominent feedback buttons to provide feedback on your flows. Turn on Einstein generative AI in Setup. Next, from Setup, in the Quick Find Box, enter Flow Creation with Einstein, and activate it. Create a flow by using the Automation Lightning app. In the Let Einstein Build your Automation section, click Get Started.
Write instructions from scratch (1), or get started with sample instructions (2).
After your draft flow opens in Flow Builder, check the flow for accuracy and safety. Also, before activating, be sure to debug and test the flow.
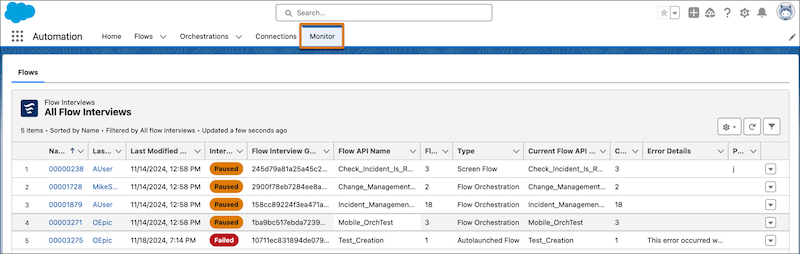
12. Monitor All Failed and Paused Flow Interviews
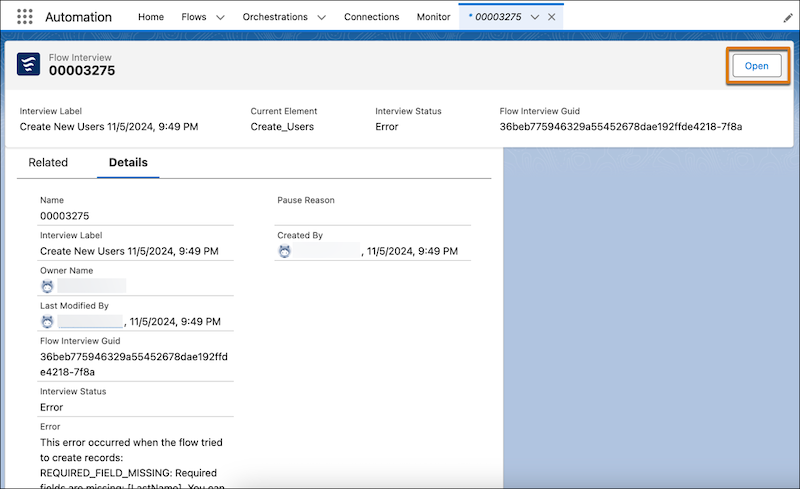
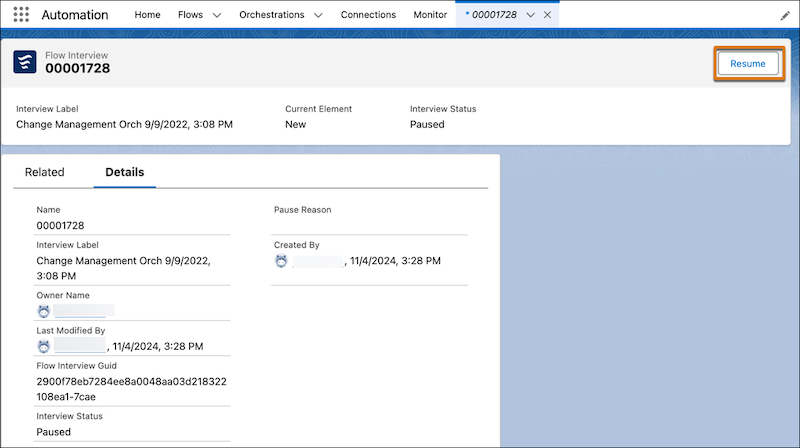
Salesforce Spring ’25 brings new Monitor tab in the Automation Lightning app is your one-stop shop for finding all your failed and paused flow interviews. The Monitor tab provides valuable data about why a flow interview failed. Debug failed flow interviews and resume paused flow interviews all from the Automation Lightning app. Having the necessary information in one place helps ensure smooth and uninterrupted business operations and improves overall efficiency and productivity. If you’ve enabled access to the Automation Lightning app, the Monitor tab automatically becomes available. View all the paused and failed flow interviews on the Monitor tab.
To debug a failed flow interview, on the Details page of the failed flow interview, click Open.
To resume a pause flow interview, on the Details page of the paused flow interview, click Resume.
13. Undo, Redo, and Save As with Keyboard Shortcuts
Increase your productivity with new keyboard shortcuts for undo, redo, and save as.
| Command | Shortcut |
| Undo | Windows: Ctrl+Z macOS: Cmd+Z |
| Redo | Windows: Ctrl+Y macOS: Cmd+Y |
| Save As | Windows: Shift+Ctrl+S macOS: Shift+Cmd+S |
Summary
Once implemented across your organization, these new features will undoubtedly simplify and streamline your work as an admin, developer and end-users. By embracing these Salesforce Spring ’25 updates, you can optimize efficiency, improve collaboration, and create outstanding customer experiences. The release notes are available for more details here.
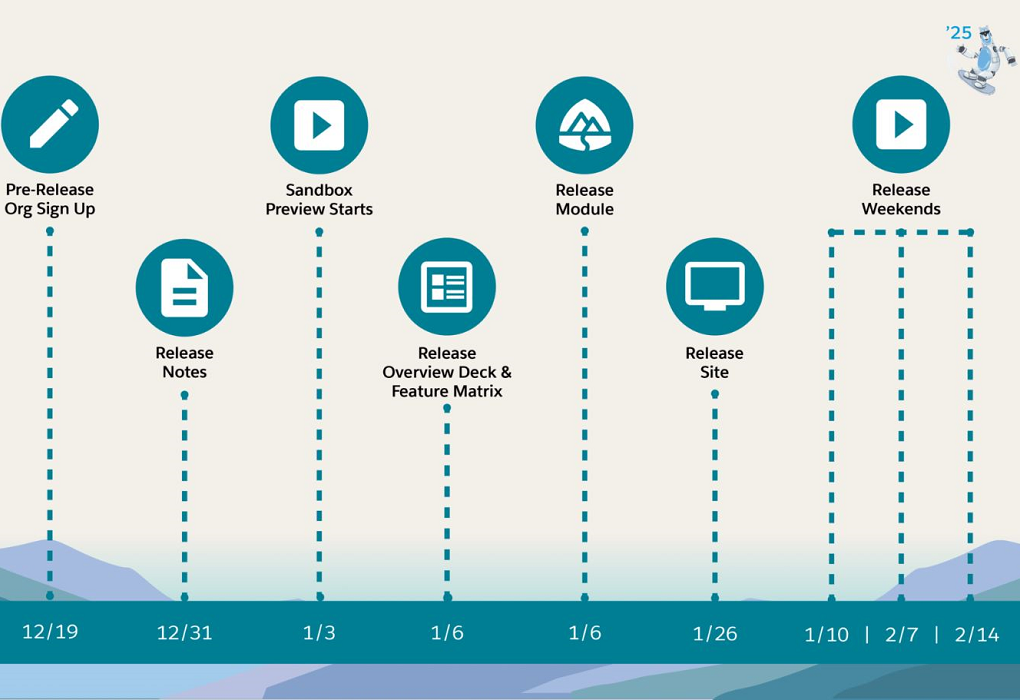
Don’t forget to sign up for a pre-release org for Salesforce Spring ’25 to try out these new features!